First steps for a new vps

Usually the first thing to do once you get a new server that will be exposed to the public internet is to hardenize it. So let’s do that:
Update the system
sudo dnf update
- If the kernel was updated, a reboot is recommended.
Create an admin user and disable the root account
- Usually the vps already comes with a user with administration capabilities. If it doesn’t, I leave the commands below:
useradd -m -s /bin/bash adminUser
passwd adminUser
usermod -a -G wheel adminUser
- Edit the /etc/ssh/sshd_config file for a basic hardening of the sshd service. You should:
- Disable root login
- Disable password authentication in order to use ssh keys (don’t forget to enable public-key authentication, this is very important).
- Only authorize specific users.
- Set a max number of tries.
- Disable empty passwords.
- Disable keyboard interactive authentication.
- Reduce the number of sessions.
- Disable X11 if you only use the terminal.
- This is the file to edit:
sudo vim /etc/ssh/sshd_config
At the end of the configuration it should look something like this:
yourUser@YourHost$ sudo grep -Ev '^(#|$)' /etc/ssh/sshd_config

Include /etc/ssh/sshd_config.d/*.conf
Port 22 ---> You can change the port number to reduce automated scans, but this is not a security messure by itself.
PermitRootLogin no
MaxAuthTries 3
MaxSessions 2
PubkeyAuthentication yes
AuthorizedKeysFile      .ssh/authorized_keys
PasswordAuthentication no
PermitEmptyPasswords no
KbdInteractiveAuthentication no
AllowUsers yourUser anotheUser
X11Forwarding no
- This configuration can be hardened even more, but just for a fresh server that you don’t know what to do with it yet, it’s fine enough.
Then you can check the config by using:
sshd -t
- If everything is OK, reload the configuration:
sudo systemctl reload sshd.service
- This is importand: the reload command does exaclty that, it reloads the configuration without killing the service. If you run restart, this will kill the master process and start it again, and, depending on your configuration, your existing connections can be terminated also. In an normal case, your existing connections can survive a restart, but be aware of this distiction. You can try to start a second ssh connection to your server before exiting your actual session, just to see if everything is OK.
Enable and add some firewall rules.
- The firewall that we are going to use for this tutorial is firewalld
sudo systemctl enable --now firewalld
With that command, firewalld should be up and running and enabled at boot time. Check it out with:
sudo systemctl status firewalld
The output should be something like this
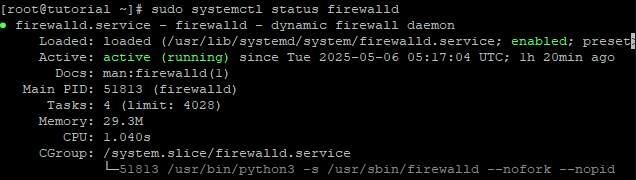
The firewalld program work with zones and each zone is assigned to an interface. Theres nine in total but for the purpose of this tutorial you should care about only one, the public zone. As the name implie, this zone is for untrusted public networks that will have incoming traffic to your server. This zone rejects all traffic and only allows what you specify. First you should find the name of your interface:
ip a
You’ll see at least two interfaces, one for the loopback called “lo” and the other shoud say something similar to “enpNsN” or “ethN” (where N is a number). Then, assign the public zone to that interface:
sudo firewall-cmd --zone=public --change-interface=*your interface* --permanent
sudo firewall-cmd --reload
And check:
sudo firewall-cmd --get-active-zones
You should see something like
public
  interfaces: *your interface*
Now allow the ssh service so it can go trough the firewall:
sudo firewall-cmd --zone=public --add-service=ssh --permanent
sudo firewall-cmd --list-all
That should show you the defalut zone with the interface assigned to it and the services allowed.
Install and configure fail2ban to protect your server from ssh attacks.
- fail2ban is a program that reads your log files and create firewall rules atomagically to ban the IP’s with a certain number of failed login atempts.
sudo dnf install fail2ban -y
- Once installed, the next thing to do is to configure it
The first thing to do is to create copies of the files that we are going to modify. This is because, when the fail2ban package is updated it can modify the default files and all your changes will be lost, so you make copies of those files and add your configuration there.
sudo cp /etc/fail2ban/jail.conf /etc/fail2ban/jail.local
Now, you can modify the file jail.local and modify it. Search for the lines:
bantime = 10m
findtime = 10m
maxretry = 5
And add the changes you want. fail2ban supports “m” for minutes, “h” for hours and “d” for days.
- The bantime is the time that an IP’s host will be banned.
- The findtime is the window of time that fail2ban will monitor for repeated failed authentication.
- The maxretry is the number of attempts that can go into that findtime.
Inside the file you should see a “jail section” for sshd
[sshd]

enabled = true ----->>> this is the line that you have to add to enable it.

# To use more aggressive sshd modes set filter parameter "mode" in jail.local:
# normal (default), ddos, extra or aggressive (combines all).
# See "tests/files/logs/sshd" or "filter.d/sshd.conf" for usage example and details.
#mode   = normal
port    = ssh
logpath = %(sshd_log)s
backend = %(sshd_backend)s
Add the “enabled = true” line, and restart the service:
sudo systemctl restart fail2ban
And check the status client to see if everyting is set up correctly.
sudo fail2ban-client status sshd
For a new vps, this should be enough. Thanks for reading!